Wednesday, June 29, 2011

Gasp! I Think I Have Found Somewhere I Like Better Than The Red Chair!


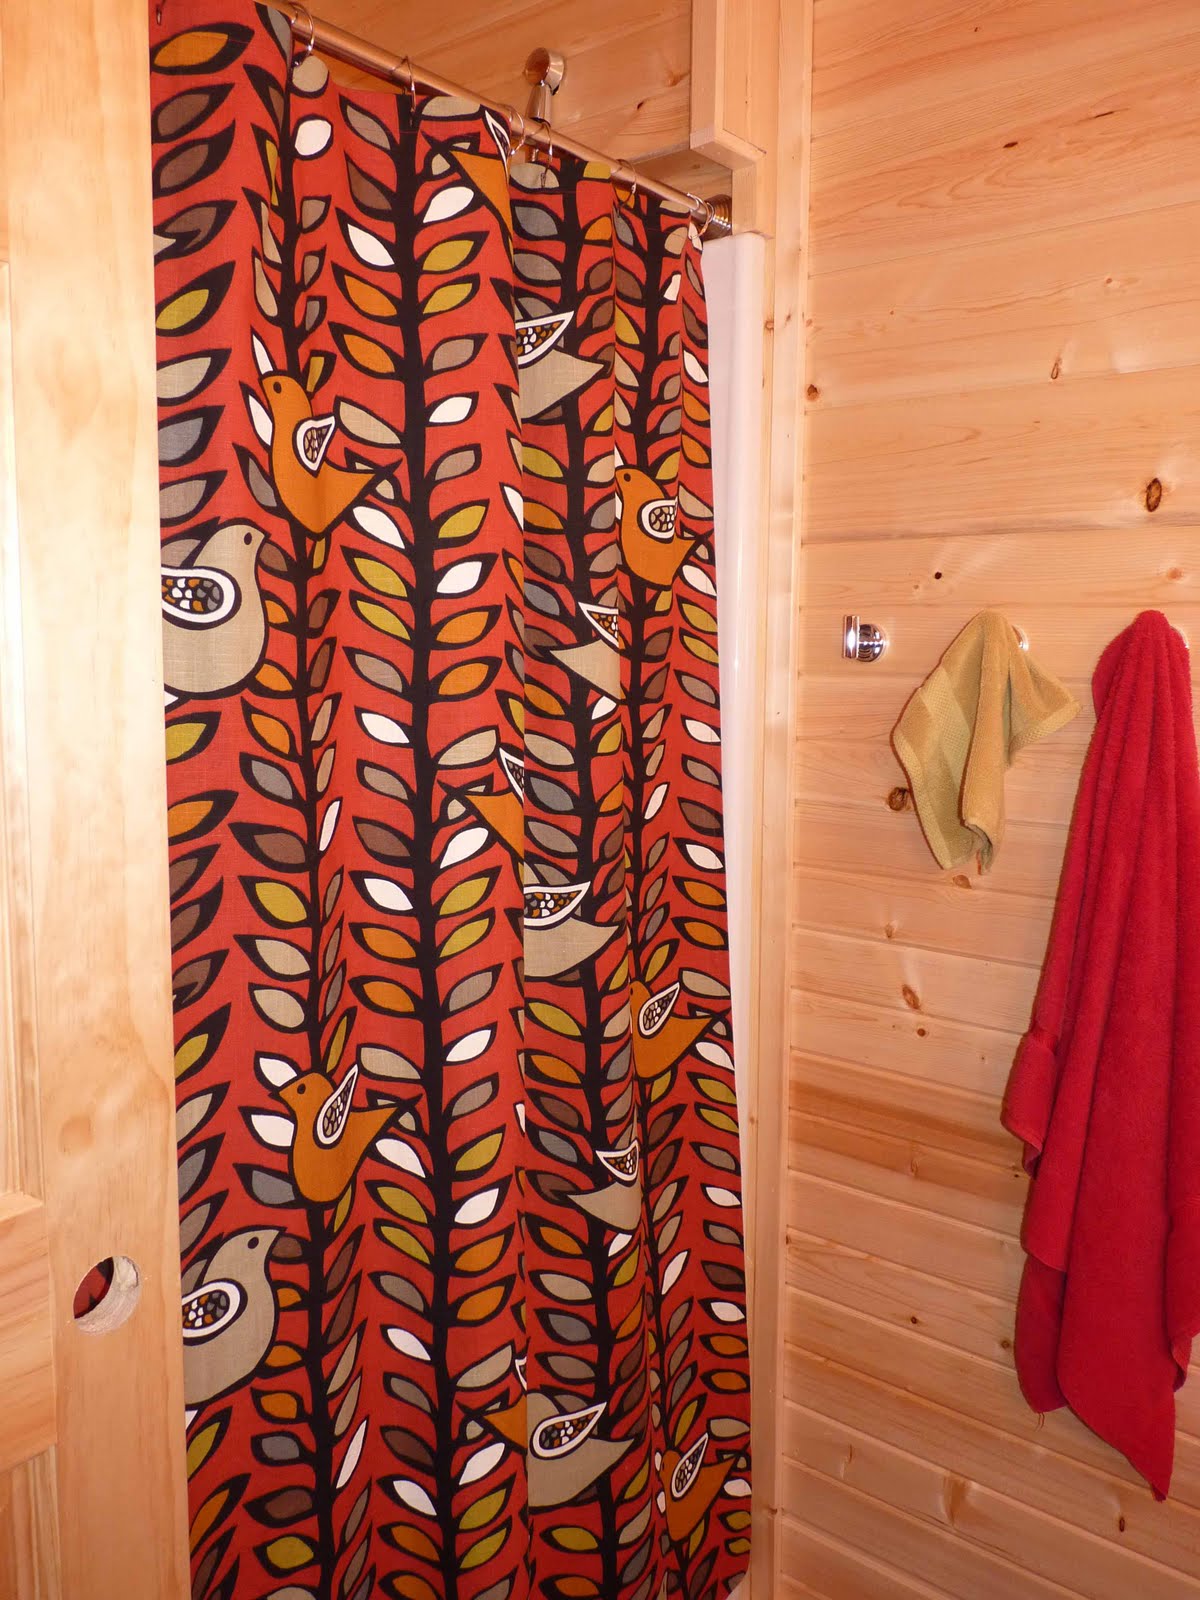
Office is somewhat set up, and it is a wonderful place to be. I find myself wandering to the white counter and doing whatever task needs to be done. The views are gorgeous...a peaceful place to work. You can see that I added a few red accents...I know you are not surprised. The handles on the cabinets are spools of thread from my Grandma Fry's sewing box. I carefully razor-bladed the threads off. I hated to do that because the thread was a wonderful, shiny cotton, but I doubted the strength of the thread after all these years. A couple had a price on them of 15 cents. Such a deal. Blacktop is in, looks...black, of course. The studio tub is in, after a few challenges. Family members start arriving tomorrow for the holiday. A good test of the new facilities. Jerilynn


Tuesday, June 28, 2011

Master Bath


Wacky days continue. As you can see from the picture, the tiles are now done in the master bath. Hard to see, but they are white subway style tiles with a narrow black tile thrown in for accent. The plumber showed up and hooked up the shower and started working, with Carl, on putting in the soaking tub in the studio bath. Problems. Not all the parts were packed with a crucial part of the whole thing. They will be delivered tomorrow, but I was disappointed that it didn't get done today (back to the whole patience thing). While the plumbing drama was going on, the blacktop people came to get everything ready for the blacktop tomorrow. But, they totally undid the sloping aspect that the excavator did. They made it so that all our rainwater would wash down on our neighbor, which isn't a good thing. So, it had to be re-done. In the meantime my dad shows up to inspect the project and was right in the middle of it all! I thought I would quietly sew a shower curtain for the master bath and the window curtains. I got the shower curtain done. Almost made the mistake of not cutting off the selvedges again, but remembered not to leave them on. The fabric is a bit sheer and a bit fussy to work with. I got the curtain done, but not just thrilled with it. I thought the white would look good with the black and white tile and the black counter top, but it is just a bit boring. I got one side of the window curtains done with the same material before I finally admitted to myself that the fabric choice was not a good one. Bummer. I did get the fabric on a great sale, but I put quite of few hours in getting this far! I will leave the shower curtain up, but I won't put the window curtain up - I have some old curtains that will work until something wonderful comes along. Tomorrow the black top is coming, and the parts will be in for the studio bath tub. I will take some shots and also show you some of the studio that I have set up. Jerilynn

Monday, June 27, 2011

Sink Top and Vanity Done!

Carl finished the studio bath sink top and vanity today! I think it looks great and very fun. I can put small toiletries in the cabinet drawers, and maybe stack some extra towels on the treadle. I need to find some small type of cabinet to store extra tp and some cleaning items. Rumor has it that tomorrow Pete the Plumber is arriving to hook up the tub. The blacktop guy is coming, also, to prepare for the driveway on Wednesday. The rock retaining wall is in...things are moving along quickly, now. I brought up more sewing supplies from our home today. I haven't found a fabric I like for the studio bath curtains, so I may hang a small quilt at the window until I find something. It might look good, and certainly give some privacy. Jerilynn

Saturday, June 25, 2011

Antique Sewing Case + Ikea sinktop = ???

Well, I think this might work...and I think it will look a bit interesting. Behind the sink (you can only see the bottom - sorry) is an antique sewing machine cabinet ( no machine inside!). I think Carl can fit the sink on to the top and I can use this as the vanity in the studio bathroom. Not a lot of storage, but it is a conversation starter. I will let you know how it looks! With Tim's help today we got all the trim done on the studio level. Carl nailed, Tim kept the saw going all day, and I just ran between the two. Plus, ran to get more nail gun nails, plus ran to the store for dinner stuff. Right before sunsel we decided to take a pontoon ride and enjoy part of the beautiful day. Another busy, fun day. Jerilynn

Friday, June 24, 2011

Wow, What A Crazy Good Day!


What a crazy, fun, productive day! Tim (son-in-law from Appleton, WI) took a day off from work and drove over to help. Carl and Tim decided to tackle the studio floor, thinking it would take two or three days. Well, after day one, you can see the results...done!!!! And, it is beautiful! What was funny, though, is that they had to trowel the glue down in sections, and at one point, we all were glued in the room...that was fine, we knew as soon as we laid the floor that we could get out, but the problem was that the trowel needed to be cleaned before the glue set up on it! The only thing we had on the studio level was the Toto toilet! We moved some of the sewing stuff out of the way, and Carl carefully cleaned off all the goo. I am not sure he was too happy that I took his picture, but I thought it was really a clever use of facilities! You can tell by the bottom picture that the floor is just beautiful. I have been told I need to wait until Sunday before I move anything out on it, but I am not sure patience is a strong quality I have. Actually, I have been thinking about Patience, and may do a small post on it at some point. What else happened? I made rum cake and banana bread and knitted a bit. Then, on top of all the floor excitement, the tiler showed up to start the tile in our bathroom! THEN, the retaining wall peopled showed up with a truck full of huge rocks. Oh my gosh. I didn't know what to look at first!!! I am glad Tim and Carl decided that I was needed on the floor project so that I could let the other workers do their job without me bothering them. Tomorrow the boys are going to finish the trim work. I think one will be in the studio measuring and nailing, and one will be in the garage sawing. I have a feeling I will be the runner in between. How fun is this??? Lots. Jerilynn


Thursday, June 23, 2011

What!? You Don't Have Any Dishcloths????!!!

Daughter-in-law number 2 casually mentioned that they a) didn't have any wool felt coasters, and b) didn't have any knit dishcloths. What??? How can that be? How can some have so much and some have so little? This almost seems political in nature. My sewing has stopped for a few days...floor is starting tomorrow for the studio...but my knitting needles are operational. Two dishcloths down. Who knows how many more to go. Ballband of Mason Dixon fame is the brown/blue one, and the other blue one is just garter stitch. I am working on a seed stitch cloth now. I love how bumpy the seed stitch is and feel it does a good job at washing things because of the bumps. Jerilynn

Wednesday, June 22, 2011

New Sewing Room

Well, I guess the great sewing area overlooking the lake was short-lived. All my sewing stuff and beading stuff and glass tile stuff is now located in the bathroom of the studio. I suppose I can perch on the edge of the tub to run the sewing machine. Ironing and cutting may be a problem.
Are you wondering why I am not so sad that I cannot possible update this blog? It is temporary, I have been told. Tim is coming up tomorrow night to help Carl finish up some wood and help him install the studio floor. We decided that if we pile all the stuff in the already-floored-bathroom, it would give a clear shot to get the work done. This means that there will be no sewing for a few days, but then...I can set up shop! I agreed to do the Sew Club lecture in August at Sew Complete and don't have any fabulous ideas yet. I sat down a couple of nights ago in The Red Chair and made a list of possible projects. The good news is that I came up with a pretty good list. The bad news is that none of the items on the list are finished, some are not even started. I have a feeling that showing pictures of curtains and wood walls just might not be very interesting. I tend to live by the motto that "things will work out for the best". I can't wait to see what I am going to talk about and show! Jerilynn P.S. I found one of my patterns for sale on Amazon. Really?

Tuesday, June 21, 2011

Great Student Clothesline Bags!

Fun class on the clothesline bags. I always learn more than the students, I swear! If I wasn't so tired, I would start a new one...maybe tomorrow! jerilynn


- Posted using BlogPress from my iPad

Monday, June 20, 2011

Master Bath Additions!


We have a sink and mirror in the master bath now! Carl split his time today between installing the sink, medicine cabinet and light, and supervising the excavating of the driveway/back-up pad. It seems like this has taken forever, but almost every day something else gets done that is exciting to see. The second, lower counter top that will be a dressing table for me gets installed next, and then we are patiently waiting for the tilers to show up to tile the shower/tub walls. I still will need to paint the vanity and make curtains. Inch by inch. We went to the grocery store tonight and when we got home we pulled right into the new garage. There is a bit of a hill to get in - hope it doesn't get too icy in the winter...:) Jerilynn

Sunday, June 19, 2011

A Blog Reader Requested More Photos...Not My Fault!


More shots of cabin work that has been done in the last couple of days, although today we didn't do any work! We just relaxed, took a boat ride with Ellen and Mike and Kali and Katie and Ben. We even watched a few fishes being pulled out of the water right off our dock. This first shot is of the studio bathroom toilet that got installed by Carl on Friday. Isn't it cool?


Carl got the wood put on the walls in the back area of the studio. Three walls are left to be done and the floor. We think Tim is going to visit for a couple of days and give Carl a hand with that. Woo hoo! Jarrett and Nick were up on Saturday and finished all the electrical work. We now have fans and lights in the studio!


Carl has all the wood done on the stairway to Heaven. Railings need to go up, but it is really looking good.


This shot is taken from the futon against the wall looking at the beds by the lake window. This weekend when we had a bunch of people stay, we have found that this family room area is becoming a gathering place. Movies, talking, reading...very cozy and open at the same time.


A look down the hall to the door to the garage. Red! Isn't it perfect! I also like how the ceiling lights look. I will have to take a picture of our outside lights that got installed on Saturday - they have a similar feel to them. Rumor has it that I may get a master bedroom sink, mirror and light tomorrow! I have more curtains to make. Never fear - I will bore you with all the details! Jerilynn


Thursday, June 16, 2011

Christmas Quilt All Done!

In between helping with the endless building project, I managed to get this new Christmas quilt pieced together. It is a pattern from Whimsicals by Terri Degenkolb called Down Winterberry Lane. Not my usual color choices at all, but something just tugged at my seasonal heart strings. Fun little graphics. Not sure where this is going to end up, but I am sure by the time the winter comes around again, I will have a plan. Jerilynn P. S. I am lying to you. I did not get this quilt done. But, I have the kit, and have read the pattern, and am well on my way to thinking about starting it at some point. Soon.

Tuesday, June 14, 2011

Bathroom Beginning


Yep, more wood pictures. This is a shot through the sliding door (that hasn't been installed yet) into the studio bathroom. Note the well-nailed wood and the hand picked planked flooring. Yes, Carl did the biggest part of the work, of course, but I did help nail and then I handed him flooring to install and cut the sizes he needed. Teamwork. He is going to call Pete the Plumber (name has not been changed to protect the innocent) to get the tub installed. The door might get put in tomorrow. I will be away from the cabin a couple of days, so when I get home I am sure I will see some new additions. Not sure what kind of fabric I want for the curtains...maybe something with red? Carl picked up the countertops today for the master bathroom. They are black high def laminate, the same stuff we used for our kitchen at the condo. Mick, the counter guy, said our condo counter was the first he sold like that and since then he has sold 7 or 8 more. So, the countertop need to get installed, sink put in. Also will need to make a shower curtain and window curtain. Something with a little black in it. And red, of course. Jerilynn

Monday, June 13, 2011

Are Pictures of Pine Ceilings Only Slightly Less Boring Than Drywall???

I know, pretty boring picture, but I wanted to show you what got done last Saturday. As I said before, Carl and I could not have gotten this done, so we are thrilled that help arrived to accomplish it! I am too tired to take any new pictures today. Why? Well, it all started early this morning while it was still dark out. All of our windows in the master bedroom are wide open to the lake view, so when all of a sudden the whole room was full of light from the lake, I woke up! Slowly going past was a big boat with the brightest lights I have ever seen! Very close to shore! Well, because I had been sleeping soundly, I thought they were police looking for bad guys hiding on the shore! So, I laid there shaky for a bit, then tried to go back to sleep. I found out today that it was simply fishermen trying to catch carp. So, after not getting enough sleep I still managed to: make four curtain panels for the family room windows, help Carl put up the wood walls in the studio bath, piece the blocks for a twin sized quilt, help Carl put the luxury vinyl tile flooring down in the bath, and soundly falling off my rolling sewing chair kerplunk hard on my bottom. Now, muscles hurting from helping with rocks yesterday, and all the other work today, I am drinking a Zombie trying not to feel how much my lower back hurts. A hot bath is in my very near future. Construction can be hazardous to my health. Jerilynn

Sunday, June 12, 2011

Lined Curtain Panel Tutorial


Here is the tutorial for lined curtain panels. The width of the finished panels depends, of course, on the width of your windows. The big deciding factor for me is the width of the fabric I picked out to use. I don't like seaming two lengths of fabric together to make a wider piece, so often I will just use the width of the fabric for each side of the window. For instance, my bedroom windows that I made these panels for are wide, so I used the width of the fabric, selvedges trimmed off, 55", for each of the two panels. The length of your curtain is personal choice. I like hanging the rod well over the top of the window - I think it looks better. The panels I made fall somewhere below the bottom of the window. I didn't want panels to the floor. Too formal and also too pricey to buy all that fabric. To the desired finish length of the panel, add 6" for the bottom hem (double 3"), and 8" for the top hem (double 4"). I used drapery lining that I bought at Mill End Textile with a coupon, so it ended up being about $1.50/yd. Good deal. Whatever length and width you want your panels to be, the lining is cut 3" shorter and 4" narrower than the main fabric. Remember that - those measurements are important.


Trim off the selvedges from your fabric. I didn't do this for the first shower curtain I made for the cabin and the seams were all puckery. Selvedges are more dense than the rest of the fabric and they just will cause problems if you don't get rid of them. Strip piece them together to make a project, or use them as ribbons for gifts.


My trimmed curtain fabric is 55" wide so I am trimming the width of my lining fabric to 51" wide, 4" narrower than the main fabric. The length of the raw curtain fabric for each panel is 83". My lining has been cut to 80" long.


Main fabric hem is a double 3" hem. Measure and press up 3", and then fold that over again and press in place. You will use your blind hem stitch on your machine to hem this as one of the last steps. You can pin these in place if you wish after pressing, but I don't usually bother. Most heavy home dec fabrics hold a nice press.


The lining hem is a double 2" hem. Fold it up 2", press, and fold again.


Stitch lining hem in place close to the folded edge.


With right sides together, match up the top folded edges of the curtain fabric hem, and the lining fabric hem. The curtain fabric hem isn't stitched down at this point, but just fold it in place and match it to the lining.


Starting at the hem, stitch lining to curtain with a 1/2" seam allowance, starting just above the hems without catching them in the stitching. In theory, the lining and the curtain fabric should come out even at the top end. If it doesn't, don't sweat too much - you can hide the discrepancy in the top fold.


Turn right side out. You will notice that the curtain fabric folds quite nicely to the inside, and the lining hem is 1" higher than the curtain fabric. Press hems and sides in place. I like to pin the hems together so they stay in place as I work my way up the sides of the panel.


Find a big surface to work on - I have two tables pushed together, and smooth out the lining and the curtain.


How much you fold down at the top of the panel depends on how you are going to hang the panel. I folded down a double 4" because I originally was going to put big grommets in the panels. Once I had the curtains done, I changed my mind and just used black clip-on rings. So, I could have done a 1" double hem, a 2" double hem, etc. The 4" double hem looks good, though and gives a lot of body to the top, so I may just use that measurement all the time, no matter how I plan to finish.


Before sewing the top hem in place, make sure both sides of your panel are the same length, and once you have one panel done, make sure each new panel is the same length, also. Some slight adjustments may have to be made to make sure they are consistent.


Sew top hem in place.


Open up the fold of the curtain fabric hem and blind stitch in place using the blind hem stitch on your machine. Look in your manual to see how to do this.


Turn in the corners of the hem and hand stitch in place.


Give your panel a final good press. All done! These really go together fairly quickly and look very professional. Let me know if you have any questions! Jerilynn


Saturday, June 11, 2011

A Good Day

Nice view out our lakeside door. Pretty night. The mosquitoes are a bit active, but not as bad as we have seen in previous years. Today son-in-law Jarrett and grandson Nick showed up and helped Carl do THE ENTIRE STUDIO VAULTED CEILING. Yes, all done. I will take a good picture tomorrow to show you. Carl was just smiling from ear to ear. He was really stewing about how he was going to get that huge ceiling done. The walls he can do with a little help, but that big vaulted ceiling was another story. I got the curtains hung on the lake side of the master bedroom. Again, I will take pictures to show you. I also took step by step pictures of how I made them, so that will be coming along, too, as soon as I get them ready to show you. Most of the time the amount of work left to be done is overwhelming, but, after a day like today, the pile-o-work seems a bit smaller. Jerilynn

Friday, June 10, 2011

What Is That Mangy Dog Doing On Our Patio????


Oh, wait a minute. That isn't a dog. That's a bear! Yes, right in the middle of the day, a medium sized bear just decided to check our our patio and then move on to the neighbors. Wow. Very up close and more personal than the pictures show. Doesn't walk on two legs like Yogi and BooBoo. Glad I didn't have any food out to encourage future visits. Jerilynn


Thursday, June 9, 2011

Much Better Now


What is much better now, you ask? Well, my computer is better. The shower curtain in the hall bath looks better. Pictures on the wall are better. I am feeling better. Last night I couldn't get internet explorer to load. No matter what I tried. Ugh. This morning I did a virus scan and all was fine. So, I did a system defrag, that took a long time, and, POOF, all is fine. In the meantime, I decided that the stripe shower curtain I made for the hallway bath was awful. I made a rooky mistake: I didn't cut off the selvages of the fabric before I sewed the seams - I though that it would save time and prevent raveling. Well, maybe so, but what it also did was cause puckering seams and it looked pretty bad. Plus the stripe was not very inspiring. I decided that the bird fabric that I was originally going to use in the master bath was just what I needed. I cut off the edges before sewing and it hangs much better than the stripe curtain. I also had the chance to hang up some pictures now that most of the trim is done on the second floor. I had lots of calendar pages I framed from Linea Designs. Love the graphic look of them. I also had a 2o1o calendar from Betsy Bowen, a woodcut print artist out of Grand Marais, MN. I framed three of the monthly prints for the bathroom, and they look really good with the bird print. I went to Betsy Bowen's web site and found out that previous year's calendars are on sale, so I ordered a couple more years. For $5 for a calendar I have 12 prints that will look great framed! I got the curtains for one master bedroom window done, two more to go. Current curtain rods aren't long enough, so a trip to the store to get new ones will be on the agenda for tomorrow. Carl continues to be a wood cutting/nailing machine. Floor two done, main floor should be done tomorrow, then the STUDIO BATHROOM is next!! Jerilynn


Tuesday, June 7, 2011

Darling Decor


Seriously cute, right? I got a coupon from Ballard Designs and saw these three safety pins (they actually open and close). All three for under $30.00. I am thinking Studio Bathroom wall. I would love to figure out some practical purpose I could give them...towel holder? Curtain rods? I guess just regular old pictures don't have a "function" other than to look good, so maybe they can just do that same thing. Look good. Love em. Jerilynn

Monday, June 6, 2011

Table Mat Completed Project


Are you sitting down? I got to sew today! Lately I have been pre-occupied with helping my folks with their health and living challenges and with working on the cabin (when I get a chance to get up there!) Carl is staying up there pretty much full time, and we keep in contact throughout the day with updates. His updates are more fun than mine (the excavators are here! bathroom counter is ordered! trim all done in the hallway!). So, while I was waiting for return calls from social workers, I decided to clean the sewing room, the storage cabinet holding unfinished projects, and the sheet closet. Why is it that halfway through a major cleaning project the area looks like a big bomb just went off? Anyway, I think I am more organized and found some fun things to take to the cabin to work on this summer. One project I found was the table mat fabric for the tutorial that I liked here. So, once I had most everything sorted out, I decided to make the mat. Went together pretty quickly. Not my usual color choices, but maybe that is what caught my eye. I could have done more quilting on it, but I do like the stitch I used. It is hard to see in the picture, but it is just a slight wave stitch. The tutorial said to do a single layer binding, and, even though I usually use a double layer binding, I thought I would give their suggestion a try. I really like how it looks and it was easy to put on. Not so bulky in the mitered corners. I just may switch my binding technique from now on! Jerilynn

Sunday, June 5, 2011

Button, Button, Where is The Button I Want?

I had this great idea to organize my buttons. A week or so ago I saw the cute glass jars with the red lids and thought I could separate the colors/types and use the jars as a decorative accent. I guess I underestimated my buttons...just a bit. The boxes are full and there are several jars of buttons behind the front jars that you can't see in this picture. What was I thinking? I don't want to buy 30 more jars with red lids! I can't really find buttons that I am looking for in the current storage system. So, this is what I need: 1) cute storage, 2) easy to locate buttons I need, 3) portable to the lake and back, 4) cheap. Ideas? Jerilynn

Friday, June 3, 2011

Nail Gun Success!

Family room ceiling is done and I am still able to use all my digits to write this blog. As you can see from the photo, we finished at 7 minutes until 5:00. Perfect timing for a happy hour relaxing beverage. All the trim is still needed, but the room looks pretty finished. Still amazed at how much work Carl has done/will need to do, to make this cabin a wonderful lake home. He has started up the stairway to the studio, and when I go back to join him again, I can help with the walls. We have been told the excavation will happen on Monday, then more cement after that. Lots of sewing to do but still a couple of weeks away from being able to set up shop. Patience is a virtue. We had the suggestion from Carl's daughter, Barb, to put a futon in the family room. Great idea! We found a wonderful wooden one at Slumberland that is pretty comfy - even Carl was impressed. Now it will feel and look more like a living space than a bedroom space. The futon mattress cover is just a light tan micro suede - someone will have to make a jazzier cover for it!!! Jerilynn

Thursday, June 2, 2011

Bedroom Curtains

This is the new fabric that I am "auditioning" for the bedroom curtains. This is a Susan Sargent print. I have been a fan of her art style for several years. In fact, the fabric I used for my two bathroom shower curtains at the condo are designed by her. She has a very colorful, fun style that is right up my alley. I like the white background and the swirls. I just crammed this fabric in the upper window for the photo, so the real curtains would be lined. I also think I would put those big plastic grommets in the top for looks and ease of opening and closing. What do you think? I would love to start stitching tomorrow, but my help has been requested in finishing the family room ceiling. Two people need to hold up the wood for nailing. I have been nail gun trained, but not so sure how good I am about nailing above my head. Maybe I will just be the "holder", not the "nailer". Wish me luck. Jerilynn


Wednesday, June 1, 2011

Memorial Day Fire in the Fire Pit


Patrick tool this cool shot with his iPhone. Not sure what ap he used, but it is very fun. You can see that we still need siding, but Joe has worked for two days since this picture was taken, so much more of the house is red (did you know that Red is my Favorite Color?). I have been at our Condo for a few days to get some things done around here and Carl has been hard at work still. He and his pal, Tom, got most of the family room ceiling done, and Carl said he has most of the master vanity built. When I go back up to the cabin for a couple of days, I will be the "helper". I am hoping I can use the nail gun again. While at home, the fabric I ordered for the master bedroom windows arrived. I will try to show you it tomorrow. I really like it, but the wild bird print will not look all that good with it. In the meantime, I am not keen on the shower curtain for the hall bath, so I may use the birds in there. I will give it more thought. Jerilynn