I made this pillow last December and found it in the Christmas boxes and was so happy to see it! It is made from a pattern by Lily Anna Stitches. I didn't do the applique by hand - each little cut-out, though is stitched in place with a tiny machine blanket stitch. For the snowflakes, I used some decorative stitches. A Bernina Webinar blog a few weeks ago showed how to make snowflakes on the Bernina 830 embroidery machine. They can be designed also in Bernina V6 software. But, since I have been in a machine stitches mood lately, I think it would be fun to play with the decorative stitches and see what fun snowflakes I can make. Like real snowflakes, I am sure each one will be unique. Not sure what I am going to put them on, yet, but if I find something interesting to do with them, I will let you know. The button picture at the top is a close-up on one of three button closures on the back of the pillow. The buttons are antique and each one is slightly different, just like snowflakes. Jerilynn
Pages
▼
Monday, November 29, 2010
Sunday, November 28, 2010
The Halls are Decked!
This year it took us four hours. Last year it took two. Carl said I definitely put more stuff out and around this year, so I am sure that accounts for the extra time. I saw wonky NOEL letters in a shot of a room in the Pottery Barn catalogue. Looked everywhere to see if it was for sale, but couldn't find it. So, I drew up the letters, Carl cut them out and painted them. They actually look quite cute up on top of the kitchen cabinets. I have been having quite a time trying to figure out what to put up there. The stuff I had up there was looking a bit tired, so I took it all down - maybe after Christmas I will have a good idea. In the meantime, the letters look great! Thanks, Carl! I just feel all Christmassy this year. Don't know why, but I enjoyed decking our halls very much today. Even got a few good ideas to try to make in the sewing room. Falalalala. Jerilynn
Saturday, November 27, 2010
Snowman on the Wine Bottle Bag in 3D
The snowman applique on the wine bag was a big hit with the littlest grandson. It wasn't all that much fun to play with, though, so today I thought I would make the applique 3D, no glasses needed. Not too hard to do, at all. I just made the bottom of the snowman a little flatter and a little wider. I measured the bottom and doubled it and drafter an oval. I used 4 layers of brown felt for the arms, with a narrow zig zag down the middle to keep them together. A little stuffing later, he was complete. He looked right at home outside today, but tonight he is not melty at all on a little side table by the Red Chair. So, now I am thinking it needs company...maybe a stuffed Christmas Tree. a Reindeer, a Santa? Wouldn't it be just so adorable to give someone the Snowman for Christmas in the Snowman Gift Bag (formerly known as the Snowman Wine Bag) ? Two gifts in one, and I get to keep the wine. Perfect. Jerilynn
Friday, November 26, 2010
Special Order Coaster
I don't get a lot of Etsy sales, so when I do get a sale, it is pretty exciting. I was contacted a bit ago by someone who wanted initial coasters. At that time, my machine was in the shop for repair, so I had to respond and say that I could do initials, but it would be a while. Well, machine is back, working great, and I finally got back to the very patient lady and designed a very plain initial coaster she liked. The above image is just a mock-up: her initials have been not revealed to protect her! I sent her a sample coaster and I just heard back that she liked it. Yay! Now to get into production. In the meantime, I got another Etsy order today! I will work on that order tomorrow and order the color of felt the initial coaster customer wants and get those out to her right away! In the meantime, tonight I helped Ellen, home for Thanksgiving, with her wine bottle bags and her Quick Card Cases. We watched/listened to the entire first season of Pushing Daisies while we were sewing. What a great show! I was sad to look up the series and find out that it was only on for two seasons. I am definitely going to watch the rest of the shows. It was very fun and sweet. We watched Benjamin today for a few hours and he discovered the wine bottle snowman on the table. He wanted to play with it, but when I took the wine bottle out and put it on the floor, he started to cry! I think it was scary. After a bit, when I made the snowman play patty-cake with the little mitten hands, Benjamin thought the little snowman was harmless and fun. I think I am going to try to make a little stuffed man for Benjamin to play with. Jerilynn
Thursday, November 25, 2010
A Cute Guy to Take to a Party
I have been in the wine bag frame of mind since my weekend sewing visit to Madison at Ellen's house. I though it would be fun to combine the wine bag tie and a design element. A scarf on a snowman came to mind. I sketched it out and this is what I came up with. It is just a single layer of wool felt with a few appliques sewn on. The arms are a double layer so they stand out pretty well on their own. He is looking pretty cute on my table - I may have trouble giving him away. Guess I will need to make more! Happy Thanksgiving to everyone. Hope you didn't overeat and had fun with your family and friends. Jerilynn
Wednesday, November 24, 2010
Cool Hat!
Fun hat finished for Benjamin. What it lacks in heavy yarn warmthness it makes up in fun color stripieness. Let me know if you want pattern/yarn detail. I am in the Red Chair and am too tired to get up to get the pattern name or the yarn I used. Sad. The pattern also has a little thumb-less mitten pattern to go along with the hat. I have enough yarn left, so maybe tomorrow after I throw in the turkey and the etc. I can do a little knitting. It is going to be a small crowd tomorrow. Not our usual bunch of people. I am still making all the usual and traditional dishes, though, at least the traditional ones for us. Most unusual would be the homemade egg noodles cooked in chicken broth. They thicken up and just taste so yummy with the turkey. Add some fresh cranberry fluff, sausage stuffing, corn pudding, potatoes, rolls, and green bean casserole, some various pies...you got a big dinner. Yummmm Jerilynn
Tuesday, November 23, 2010
NOEL Coasters
I thought it would be a good idea to design a set of coasters that said NOEL. People can tell what drink is their drink by what letter coaster they used. If they are lucky enough to have a name that matches one of the letters, well, that is good, too! I used the Bernina V6 software. I first designed the little holly leaf and a swirly stem. By copying, pasting, turning, mirroring, I managed to make a holly border. I then made a tiny circle, and duplicated them here and there for berries. I put a good-looking letter in the middle, outlined the satin stitch, and framed the whole thing with a blanket stitch. Once again, the picture is taken indoors, at night. I am sure they would look lots better in the sunlight. But, I think they look great in person. You will have to believe me. I think I may post these for sale on my Etsy site. I will try to get a better picture first. On the cabin addition: the basement walls are done, and the garage walls are poured. It really looks great!! Our petition to get a variance went through. What that means is that the sewing studio can be on top the existing structure, which is two feet too close to the neighbor. But, the neighbor doesn't mind, and putting the studio on the existing walls makes it much more structurally sound. We picked out what windows we want, both for the new addition, and to replace the old windows that are a bit drafty. They can be tilted down to wash from the inside - I love that feature! This will be an exciting season! Speaking of Season: when the kids were little we always joked that we were going to send a Christmas card out without Ellen's picture. We would then title the card, No El. Jerilynn
Monday, November 22, 2010
Reusable Wine Gift Bag Tutorial
This weekend in Madison, my daughter and I worked on a way to make a fast but cute reusable wine gift bag. The above photo is a picture of the ones Ellen made and also some of her Quick Card Cases she has done. Fun, huh? You can sorta tell from the photo that each bag has two side, and each side has sewn-in ties that are the fabric of the other side. I should take a picture of the bag on a real bottle so that you can see how great they look. They are pretty easy and quick to make. You will need two fat quarters of two fabrics. Layer the fabrics right sides together and press. Cut out two 11" x 16" rectangles from each fat quarter (I cut the rectangles from the layered fabric.) Cut two long strips from the remaining fabric that are 1" x 22". You will have barely any fabric left - maybe just shavings from squaring things up. Sew the top edge (the bag is 11" wide and 16" tall, so the top edge is one of the 11" edges) , right sides together, one color of rectangle to the second color. Press seam open and then press the two halves together, right sides out, creating a nice sharp top sewn edge. Press under 1/4" on one bottom edge of one of the colors. Open sewn unit and fold lengthwise, matching the top seam. Sew across the bottom of the color that didn't get pressed under, up the long sides, and end at the bottom of the second color, leaving the bottom open for turning. Turn right side out, tuck pressed bottom edges in, and machine stitch closed close to folded edge. Tuck one color inside the other color and marvel at how nice that pre-pressed top seam looks. Take two of the long strips (1" x 22"), one of each color. Fold in half, stitch a scant 1/4" seam. Using a Fast Turn tool, turn tie inside out. (I really don't know how you can turn those tiny ties without a Fast Turn tool. I suppose you could use ribbon here - might be cute). Repeat for second color. Position ties 4.25" down from top seam on the side seam, one on each side. Carefully pin in place and stitch both in place at the same time. I try to line up the stitching with the side seam so it doesn't show. Trim the raw edges of the ties at an angle and tie in a single knot close to the end. The unused ties of the "lining" color just tuck inside until they are called to duty when turned that side out. Throw in a wine bottle, and tie in a bow. Or, use for any type of long gift. This technique can be used for any sized bag, really. At Hancock Fabric in Madison they had a gift/decor area and they had a black wine bottle shape that opened up to reveal a set of wine tools. Very sharp! Wouldn't that make a great gift when placed in a hand made wine bottle fabric gift bag? Jerilynn
Sunday, November 21, 2010
Sewing in Madison, Wisconsin
Greetings from the capitol of Wisconsin! I am at my daughter, Ellen's, house for a sewing weekend with her and her friend, Heather. We did a little shopping yesterday and then came home to a big turkey breast that had been cooking in the oven, a yummy salad, and a couple glasses of wine. We started up the sewing machines and got to work. Both Ellen and Heather went to design school at Harrington in Chicago and are create sorts. And, both are participating in Holiday Fairs the first weekend in December, so they both are in production mode. Heather is taking screen printing classes in Illinois, so her projects are screen printed. Her candy cane swirl red pillow is really cute. Ellen is in a sale with a couple of other women here in Madison. So far she is making Quick Card Cases (what??? You don't have that pattern yet?). Her fabric choices are great! I think today she might make some two sided wine bottle fabric bags. We went through several design samples before we settled on one that is easy to make, reversible, and cute. I will try to get a quick tutorial up on the blog. I worked on a new shape for the Big Bottom Bonnie Bag. What do you think? For some reason my computer did not like her wireless router. I tried all the tricks I could think of....that is why these posts are late. I will try to catch you up with the pictures of what we did. I am home again, tired, but have a happy heart. Jerilynn
Friday, November 19, 2010
Big Bottom Bonnie Bag in.....Wool Felt!
As I talked about in an earlier post, I am having fun using the stitches on my machine to make felt squares. Previously, I had designed this type of stitching using digitizing software and then sewing them out on my embroidery machine. I challenged myself to use just the stitches in my sewing machine and am finding out that this is tons of fun! Using different threads is fun, too, and I have been using a lot of King Tut variegated thread from Superior Threads. The above pocket is sewn out using shades of green. The stitches do not have to line up perfectly in the corners...I give you permission just to play with designs and threads and have fun. I also like the zipper that I used. I ordered the Brastique YKK zipper from Ghees. I love the zipper pull and also the "steampunk" finish of the zipper. I am going to be on the lookout for more colors and a bit longer length. I used a charcoal grey wool felt on the outside, and lined it with a red. It is very soft and fits perfectly in the bag that I made (can't tell you too much about that right now...secret stuff!) Go buy some wool felt somewhere - Sew Complete in Eau Claire, WI, carries a bunch of colors, and you can order it on line at Wool Felt Central. Cut the squares into 5" and draw a diagonal chalk line from corner to corner to help keep your stitched squares square. I usually stitch the first one out about 5/8" from the edge and keep making smaller squares. Once you are all done, give it a good steam press and trim to 4.5". Stitch on to another square for a cute coaster or a fun pocket on a Bonnie Bag. What??? You don't have a Bonnie Bag pattern? Where have you been? Let me know and I will gladly sell you one! Jerilynn
Thursday, November 18, 2010
Did I Ever Tell You That I Like Wool Felt?
Well, yes, maybe I have mentioned it before. I taught a Folkart Clothesline Tote class this afternoon and tonight so I didn't have much of a chance to day to make anything and take a picture of it. I did make 7 layer bars for the students, so I suppose I could show you a picture of those. But, what I did take a picture of is one of our coasters. Our last name initial is an "L" and is in the corners. Our first name initials are bigger in the middle of each side. I used an interesting font, and I think the overall look is more like a design rather than a coaster with initials. It is so satisfying to make these little 4.5" squares. Just use a double layer of wool felt, stitch something on it, and, Viola! coasters. You can slip one in a birthday card and you won't have to add extra postage. For more ideas visit my Etsy shop, jerisew.etsy.com. You certainly can order some coasters, but they are cheaper to just to make them yourself. Jerilynn
Wednesday, November 17, 2010
This is the Very Last Blog about Bathrooms
I promise. This is the last blog about bathrooms. Shower curtains are just so darn easy to make, though! When I found out that the banyan leaf outdoor fabric also came in white AND it was on sale...well, I just had to buy some to make a shower curtain for the downstairs bath. This was a full size curtain, however, so I had to buy 4 yards. I have some leftover, but so far I haven't found anything to use it for. I digitized some of the leaves on the Bernina V6 software for matching towels. This bath isn't a "theme" - just lots of color. Strange, though, is that I have used shower curtains two different times to make regular curtains for windows. They weren't the plastic curtains, just interesting fabric. So, I do fabric for shower curtains, and shower curtains for fabric. Grass is always greener. Jerilynn
Tuesday, November 16, 2010
Banyan Leaf Curtain and Towel
I sure hope you didn't lose any sleep over the anticipation of the shower curtain and the matching towel. After I took this picture I realized that it isn't all that showy or remarkable. I like it, but I am not sure it is so "blog worthy". The fabric is an outdoor fabric designed by Susan Sargent. It was pretty pricey, so instead of buying enough to do a 70" x 70" shower curtain (standard size) , and buying 4 yards of 54" fabric and seam it together, I bought just 2.25 yards and made the curtain narrower. It works fine, because this is on a shower, not a tub. I still use a plastic liner inside, although I think it may be fine without it. Using my Bernina V6 software, I designed an embroidery that is like one of the banyan leaves in the curtains. The banyan tree is a really cool tree! There is a HUGE one in the courtyard of the place we used to rent at the beach in Florida. Lots of cute little lizards played on it, and it was a nice shady spot. So, when I saw this pattern on Susan's website, I thought it would be a subtle addition to the bathroom that had the beach sand tubes on the wall. Themey, but not toooo themey. I also bought a mermaid hand hooked rug from Susan Sargent and it looked pretty stupid in the bathroom. A plain green one looks just fine. I had just a little of the fabric leftover and I made a very tiny valance for the window above the shades. Not too much of a valance fan, but the fabric was so expensive that I just wanted to use every bit of it! I hate to tell you this, because of the cliff-hanger from yesterday, but this very exciting story has another chapter. See you tomorrow! Jerilynn
Monday, November 15, 2010
A Little Bit of Sand, A Little Bit of Dirt
Yay! The digging for the cabin addition started today. As you can see from the picture, there is snow on the ground, but we have been assured that it doesn't matter. Now it is starting to seem more real. The gas got turned back on in the cabin, so now we even have some heat! No water, though, until the new basement is dug and the walls put up. Pretty exciting stuff. Usually this time of the year we are visiting the sugar sand beach of Gulf Shores, Alabama (second tube-o-sand from the left). This year with the building going on, and the health of my folks, we decided to forgo the beach and stick around. I found the test tubes at CB2 in Chicago. They have a little hole in the back to fit over a nail. I have collected bit of sand from some of our favorite beaches and thought this was a good way to display it. I made a shower curtain for this bathroom out of an outdoor fabric that has banyan leaves on it. I will show you the curtain and towels I made to match tomorrow. I hope you can sleep tonight. Jerilynn
Sunday, November 14, 2010
I Keep Clean Wearing an Apron
Yesterday's afternoon class was a holiday apron. What really made me want to take this session, however, was this silly little , little apron! The apron and little apron were printed on a fabric panel. We cut them out and then lined them with a coordinating fabric to make them reversible. Even the little one can be used on either side! It could fit a doll, but I think it looks great on the Joy soap bottle - the bottle even fills out the top! It is so silly and goofy. Now I am thinking I need to make more little aprons...wine bottles need them, liquid hand soap containers need them. I am sure this new production of mini me cover ups will really make my children wonder about my sanity. How many would you like to order for Christmas gifts? On our new wood floor update: this morning I noticed the floor( the NEW hardwood floor) in front of the fridge was slightly warped. Yep. The fridge was leaking enough from the ice maker hook up that the floor got wet and warped. Very bummed. Have no idea what next. So, tomorrow when we go in to pay for the floor, we will need to order two more boxes of wood and set up a time for the installer to come in, tear up, and put new boards down. This is not good. Jerilynn
Saturday, November 13, 2010
Snap Happy with a Bit of Bling
This was this morning's project at Sew Holiday 2010. It is a 7 1/2" x 6 3/4" pouch from the pattern Snap Happy by Stitchin' Sisters. This uses 3/4' metal carpenter measuring tape as the "snap" in the top facing to open and close the pouch. The kits were all pre-cut, so all we had to do was the sewing! Most of the students used an embroidery of an open daisy-type design. I decided that since I have an embroidery machine at home, I would let the other ladies use the machines at the class and I would just use some decorative stitches to stitch the layers together. Plus, as you may know, I have been in a bit of a decorative stitch mood. Two of the teachers had a stash of hot fix crystals and we could use some to bling up the pouch. Now, those little crystals have been around for quite a while, but all of a sudden, I just think they are just what I want! No, I haven't put them on everything. Just here and there. The construction was pretty fast and I think I would like to make more of those little pouches. The pattern has several other sizes, and instructions to make almost any size you want. The trimming of the metal measuring tape wasn't too hard - you just need strong scissors that can cut thin metal. Duck tape is then wrapped around the cut end so that it is not sharp. I hope Carl doesn't notice a missing tape or two. By the way, I was pressing something today and the iron caught on fire! Sparks, fireworks, then fire. I didn't get hurt, nobody did. It was just a bit scary. I am so glad that I am here visiting with you tonight. Plus, my pouch was happy to be photographed in the Red Chair. Jerilynn
Friday, November 12, 2010
My Next Sewing Machine Needs Spellcheck!
Tonight, tomorrow, and tomorrow afternoon I am attending the 2010 Sew Holiday Workshop at Sew Complete. What fun! We make three different projects, kits all cut and ready to go, AND get fed! Dinner tonight was a yummy Many Bean Soup (fiber is VERY important for women of age). We get breakfast for tomorrow morning's class, and we get lunch for the afternoon session. Tonight's project was a big bag using the Double Diamond Ruler and a pattern by Jill Hix, Double Diamond Tote. I decided to be "creative" and program my machine to stitch out Sew Holiday 2010. Well, for some reason, a "J" got in front of the "S" in Sew. I didn't notice it until I had stitched the WHOLE strap! I laughed so hard and had the rest of the class in "stitches", too. I corrected the spelling for the second strap, but I have a feeling that this tote may just be a favorite project tote because of the crazy handle. I was using the Bernina 440, which doesn't show the whole line of what is going to be stitched...at least that is a partial excuse. Was I trying to write JERISEW? Who knows. You know, we always wonder what sewing machine manufacturers are going to come up with next - each new model has tons of new features. Well, I think I may have to request a machine with Spellcheck! Sew...I am back home, in the Red Chair, with a glass of wine, looking forward to another sewing day tomorrow. Isn't making stuff just the best fun? Jerilynn
Thursday, November 11, 2010
Iphone Cozy
My daughter-in-law, Katie requested a cozy for her new phone. I looked in Ravelry and found several options, and decided to give the "sock" look a try. I used some sock yarn that I had on hand and size 1 double pointed needles. The instructions, here, we brief, but easy to figure out. They said to close the bottom with the Kitchener stitch, which is usually used to close toes when you knit socks. I am not sure that I am a Kitchener expert yet, but the closure did turn out pretty good. There isn't any Velcro or button keeping the case closed - jut the ribbing should be enough to keep the sock in place. This only took a couple of hours...pretty cute, I think! It was nice sitting in my Red Chair, just relaxing and knitting. The new floors got done today and they look really good. We worked hard getting stuff put back in place. I did a little decluttering at the same time. A good day. Jerilynn
Wednesday, November 10, 2010
Am I Too Old for Steampunk?
This bracelet and earrings are made from some wonderful beads that I bought on Etsy from a seller named Loupiac. I love her stuff! I will say the usual "the picture does not do the beads justice" remark. But, it is true. These beads are fun shades of gold, red, burgundy and orange. I used some fittings from Vintaj Natural Brass. Have you noticed the Steampunk trend in beading? Well, maybe you aren't a beader....so maybe you haven't noticed the trend. I have read that Steampunk is the intersection of technology and romance - Steampunk jewelry designs usually are not symmetrical, and have chains, charms, quirky components. Little pieces of art. Well, the above bracelet is not Steampunk, but does use some Vintaj brass, and Vintaj Natural Brass is used quite a bit in Steampunk designs. Their website is fun to look at. Also, check out Loupiac's other beads. I would love a set that she has on her site now called Alchemy, but we'll see. I have made a few pieces of jewelry for the Dancing Bird Art Gallery in Cumberland, WI, and the first necklace I sold was almost Steampunk, maybe a little punk but not much steam. It had chains and charms and I gave it a clever name, but for the life of me, I can't recall what it was. Guess I better keep better records. Jerilynn
Tuesday, November 9, 2010
Where Have All the Handknit Scarves Gone?
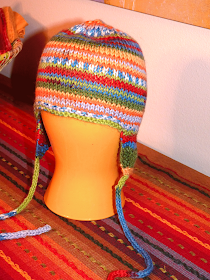
In the evening I like sitting in my Red Chair and knitting. My sewing room is in the lower level and I just like being up here, half listening to/watching the tv, maybe having a little glass of wine, talking to Carl about the day. For many months I was on a cotton yarn dishcloth knitting kick - until my kids threatened to put me in a washcloth rehab unit. So, now I am knitting other things, mostly all small projects because it keeps my interest. The latest projects are out of an interesting wool yarn, Zitron Opus 1, mit Aloe and Jojoba (made in Germany, of course). It is a super soft yarn, and maybe I should have found some slipper sock pattern. The yarn would have been wonderful on my feet! But, the hat is done, and the scarf is getting there. The hat is a basic rolled brim hat from here. The scarf is an open, repeating pattern from the wonderful book, Scarf Style, by Pam Allen. I bought that book a few years ago, and just recently looked at it again, and found several wonderful possibilities for the Red Chair times. When I went to pull a scarf out of the scarf basket the other day, I only found "store bought" ones....where did the handknit ones go??? I think I have been "gifting" them as I get a compliment. I must stop that bad habit if I want to be stylish in handknits this winter! By the way, the wooden hutch that you see in the lefthand corner doesn't normally live across from the Red Chair. Our floor is not yet done, so we have an interesting mix of kitchen/breakfast room/dining room stuff everywhere. Good news is that the parts of the floor that are already done are really pretty. Youngest son Peter came over tonight and said "Oh, oh." We all knew what he meant. Jerilynn
Monday, November 8, 2010
This hangs in another part of the mud room entryway. I made it quite a few years ago but I still like this little quilt. It is outlined quilted with big black stitches, the appliques are sewn on with a narrow zig-zag that matches each fabric. The prayer is handstitched with black thread. As I have moved away from most of my wall hangings and country decorations, some of the favorites continue to stay. I suppose I could show you a picture of what our kitchen, breakfast room, dining room and main entry look like...the wood floor is being replaced after a leaky fridge episode last summer. Appliances and furniture are stacked everywhere! I am afraid, though, that the nice new floor may have a domino effect...all of the other almost -10 year old stuff is going to look a bit dreary. I suppose, though, if I get all updated and new, my patchwork wall quilt would have to be packed away. I guess the old appliances can stay awhile. Jerilynn
Sunday, November 7, 2010
Stretched Fabric Panels
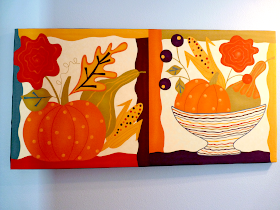
Back in the 70's and 80's, fabric panels stretched over wooden stretcher bars were an inexpensive and popular way to add big pops of color to a wall. Marimeko panels were especially fun, and a local Scandinavian store had a bunch of great fabric pictures. I guess I have never completely let go of that "look" so when I saw this big panel from Sandy Gervais, I just had to buy it! I bought the fabric panel a couple of years ago, and just last fall finally got around to stretching it. Of course it is big - maybe 24" by 44"! I couldn't find a spot big enough to house it for the season. But, then, I found that it looks just perfect in the mud room entry from the garage to the kitchen! I love the colors with the blue walls - very cheery. It has caused a bit of a problem, however. When the Christmas holiday comes around, I don't have a nice big panel to replace it with. There are various Christmas fabrics out there, but I just have it in my mind to find something a bit modern, Scandinavian, funky...whatever. I supposed I could do three smaller stretched fabrics...maybe I could do a fun appliqued panel... I saw a super huge spoon and fork out of metal at Pier One and thought maybe I could just hang those there. They are fun but not colorful, and not fabric, of course. In the whole scheme of things that is going on with the family and in the world, finding a picture for the mud room seems pretty trivial. All I am saying is that I am open for suggestions. Jerilynn
Saturday, November 6, 2010
Birthday Bib in Action
The birthday boy enjoyed his cake wearing his new birthday bib. This picture was taken a little before the big cake mess - he was having a good time. Under the bib was a cute onesie shirt with an iron-on graphic that said "It's my birthday" under a cute blue monster holding a cupcake. Very cute, but for some reason, the iron-on flaked quite a bit. I guess I didn't read the instructions very carefully. I will do that next time I make a tee shirt. Jerilynn
Friday, November 5, 2010
What did the Cotton Say to the Wool? "I've Been Shot!"
I have fallen in love with the new shot cotton fabrics from Kaffe Fassett. Shot cottons are solids that are woven with two different colors of threads. So, while a solid, there is a very interesting texture/color play going on. I bought quite a few at the Madison Quilt Expo in September and I am not quite sure what I am going to do with them, but some of these modern quilts that are out there now are good options. They remind me of the very traditional Amish quilts which were done with solid fabrics. If you get a chance, look up some of the traditional Amish patterns and be prepared to be amazed at their beauty. The quilt pictured above I made back in the 90's and is a Double Nine Patch. It is hanging in our stairwell, and, yes, it is straight and square, but I took the picture at an angle so it looks a bit wonky. Anyway, I made it using a very unique line of fabric at that time. The colors are shot cottons, and all the colors in the quilt were on the same bolt of fabric! Yes, the fabric came with big stripes. I cut the stripes apart and sewed them back together, hoping to get some interesting contrast. I loved the results back then, and I still love the quilt today. It is old fashioned and modern all at once. So, seeing all the shot cottons that are out now was a little trip down my quilting memory lane. I know that there are lines of fabric now and then that have several colors, or even several stripes of prints on each bolt. If you see such an animal, buy a yard or two and have fun! By the way, my sewing room still looks pretty good. I made an embroidered coaster today on my machine that just got back from repair and it looks great. Yay! Just in time for some holiday crafting! Jerilynn
Thursday, November 4, 2010
Wow! This is Bright!
Yes, it is. But, if you were an 8 year old Boise State fan, you would think the color was just perfect! Now, times this quilt by two...yes, our grandson has a bunk bed, so two of these quilts were requested. I had to order the Boise theme fabric online because for some reason, our local fabric stores were fresh out! I could, however, find the solid blue and the solid orange that matched pretty good. Because of the busy theme fabric, I felt the best approach for a quilt pattern would be a simple stripe, almost giving it a camp blanket look. To be nice and sturdy (and to also speed up the finishing process) I brought the back fabric, which is the theme print, to the front, turned it under once, and zig-zagged it into place. Just to please the traditionalists, though, I did miter the corners. The second quilt has the colors in the opposite places, so Jonah will be able to tell the difference between the quilt that fits on the bottom, double-sized bunk, and the one that fits on the top, single-sized bunk. I have enough fabric to make a pillow case, but I think I should make two...so, back to the fabric store to buy more orange and blue. Jerilynn
Wednesday, November 3, 2010
Pile-O-Pretty Clouds and Pile-O-Napkins
My sister is here visiting us from Arizona and she brought along a new dinner plate and a new lunch plate to show me her new dishes. We went to the fabric store and she picked out two fabrics for some new napkins. Zip, zip with the serger...and...poof! New napkins. A while back I used cloth napkins on special occasions. Now I try to use them everyday. Some days it is pretty easy to grab a paper towel or a paper napkin, but the cloth ones I have made for us are very soft and pretty and reusable. I like using clip clothespins with names written on them to keep track of napkins between meals. Unless I make something pretty messy or gooey, they can be reused several times before being washed. I have found that a fat quarter is just the perfect to make an 18" x 18" napkin. Thus, you can get four out of a yard. You also can sew two squares, wrong sides together, leaving an opening for turning. Turn right side out, press opening closed and topstitch around the edges. Obviously you need twice as much fabric, but the double cloth napkins are very nice. For everyday use, it is fun to have a bowl of assorted fun colors and prints. A good gift for someone would be just such an assortment, even matching some of their interests to the many prints out there. Great way to use up some of those fat quarters that are just waiting to be used. Bonus picture tonight. Did you happen to catch the sunset around these parts tonight? Wow. The picture does not do it justice at all...by the time I got the camera out, the neon orange in the dark blue/grey clouds was almost gone. Jerilynn
Tuesday, November 2, 2010
Birthday Bib for Ben
Hmmm, looks like I have a sunny gold carpet, doesn't it? The shade is actually supposed to be a light beige. The color of the bib is pretty close. I took this shot tonight, sunlight would have been better. I know a little about fixing photos in Elements, but I need to learn more. I have taken some great tutorial classes at Jessicasprague.com. I would recommend them highly. They are mostly geared to digital scrapbooking, which I don't do, but most all tutorials have good information for other digital crafts. Anyway, the bib is for youngest grandson, Benjamin, who turns one this weekend. I thought I would knit a quick little bib for him, and I found this one at
http://downcloverlaine.blogspot.com/2009/10/cupcake.html. It knit up quite quickly, and I think it is pretty cute. A hint was given that some little mittens might be a good gift, so I will see if I can find something easy and try a pair. Do babies need a thumb or is just a little knit pouch a better idea? How in the world would I do a tiny thumb, anyway? I think I have a Polar Fleece mitten pattern for babies in a book somewhere. Maybe that would be a better idea. The weather around here has been pretty nice, so far no hand coverings are needed. Be assured....the winter is coming. Jerilynn
Monday, November 1, 2010
Jelly Roll Quilt
I looked up Jelly Roll in Wikepedia and was shocked at all the definitions! In the case of this blog, however, the Jelly Roll is a bunch of rolled 2.5" strips, usually from one collection. This is good and bad. Good, because if you can find something to make with them, all the strip cutting has been done for you. Bad, because sometimes if you use the entire collection from a designer it is a bit too matchy, at least for my taste. Well, in the above quilt, I used three Jelly Rolls, and I don't remember the name of the collection - it was from about three years ago. I randomly sewed the strips together, added some at the bottom to make the quilt a bit longer, and had my favorite machine quilter, Jennifer Bauer, quilt it using a little posie shape. It won't be an entry into any quilt contest, but it makes a nice blanket for the cabin guest room (soon to be part of the master bedroom). You can see the striped curtains - the leftover fabric was in the master bedroom quilt, remember? The painted headboard was originally a dark wood color. I painted it Rhubarb from Benjamin Moore (well, Carl actually did the painting, but it was my idea). After a coat of poly, I sanded here and there to expose a bit of the wood color. Carl questioned the sanity of that move. What you can't see in this room is an old dresser, painted a light turquoise...yep, sanded that one, too. Jerilynn